
Fabric covered lantern - a tutorial
September 20, 2011
I saw this idea in a magazine recently and thought it was cool and that I would give it a go.
You will need:
- Paper lantern (mine has a small globe in the base which is battery operated). I picked mine up from a Chinese variety store
- Scraps of fabric
- Craft glue

Step 1: Begin by carefully removing the top ring from the lantern.

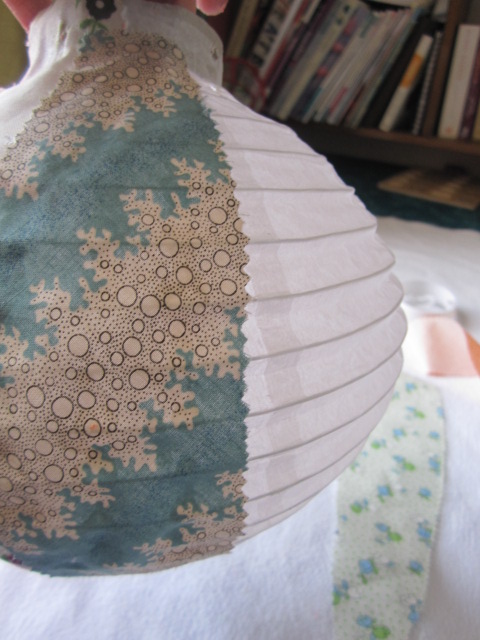
Step 2: Measure lantern from top to bottom and cut pieces of scraps in eliptical shapes to fit. I used pinking shears but you could just use regular scissors if covering in cotton as the pieces are unlikely to fray.

Cut 3: Apply craft glue liberally to back of scraps and stick onto lantern - you will need to stretch lantern out as you go so that the fabric sits as flat as possible while drying. Overlap fabric pieces as you go so lantern is not showing through.
Cut 4: measure base circle and cut a piece of fabric the same circumference about 1.5 cm wide. Cut across circle at any point so that you end up with a 'c' shape.

Step 5: Wrap circle around base fo lantern and overlap ends so that circle sits flat against lantern. This will cover up the raw ends of the scraps underneath.
Step 6: Carefully fit top piece back onto lantern also (no pic).

And here is the your lantern! I tried taking some pics of it at night with light on but the photos didn't look any good - the lantern did though! Very pretty.

4 comments
Gorgeous! Great way to use up scraps in your stash too.
ReplyDeleteWow! What an awesome idea. Too clever really... and the result: marvellous.
ReplyDeleteWhat a cool idea! I have a few lanterns that I picked up from Kmart for $2 each.. this will be the perfect project for them!
ReplyDeleteConsider me your newest follower :)
Cass
http://casscansew.blogspot.com/
pandora jewelry, doke gabbana, supra shoes, coach outlet, louis vuitton, toms shoes, pandora charms, ray ban, links of london, louboutin, louis vuitton, juicy couture outlet, ugg uk, lancel, wedding dresses, gucci, louis vuitton, ugg,uggs,uggs canada, oakley, ralph lauren, juicy couture outlet, montre pas cher, swarovski, michael kors outlet, ugg pas cher, nike air max, ugg,ugg australia,ugg italia, louis vuitton, louis vuitton, replica watches, hollister, converse, hollister, vans, marc jacobs, thomas sabo, ugg, michael kors outlet online, swarovski crystal, pandora uk, karen millen uk, converse outlet, michael kors handbags
ReplyDeleteThank you for taking the time to comment - it makes my day☼